User Guide
Everything you need to know about controlling your Mission Bike Lights.
Quick Navigation
Getting Started
Mission Bike Lights is a mesh lighting system that can be controlled from multiple interfaces. Here's how to get started:
First-Time Setup
- Power on your first node — It immediately starts broadcasting over Bluetooth and creates a WiFi network called "MissionBikeLights"
- Open the iOS app — It will automatically discover and connect to your node via Bluetooth LE. No WiFi required.
- That's it! You can now select programs, adjust brightness, and configure your lights.
Optional: Web Interface
To access the on-node web interface from a browser:
- Connect your phone to the node's WiFi — Join the "MissionBikeLights" network in your phone's WiFi settings
- A captive portal should open automatically. If not, browse to
http://missionbikelights.local - You may need to select "Use without internet" to stay connected to the node network
- You can disable the captive portal in Settings if you only use the iOS app
Optional: Home WiFi
In the iOS app's Settings tab, add your home WiFi credentials so nodes can check for firmware updates automatically at boot.
Choosing Your Interface
| Interface | Best For |
|---|---|
| iOS App | Full control — program selection, node configuration, firmware updates, all settings. Connects via Bluetooth LE (no WiFi needed) or local WiFi. |
| Watch App | Quick access while riding — brightness control, next/previous program |
| Web Interface | Initial setup, WiFi configuration, direct node access without app |
iOS App iPhone Application
The iOS app provides complete control over your mesh lighting system through three main tabs.
Bluetooth & WiFi Connectivity
The app connects to your mesh using two methods, automatically choosing the best available:
| Method | How It Works | Best For |
|---|---|---|
| Bluetooth LE | Direct connection to a nearby node. Just have Bluetooth enabled on your iPhone — no WiFi setup required. | Primary connection. Fast, always available, works anywhere you ride. |
| Local WiFi | Connects over your local network when your phone and nodes share the same WiFi (e.g., at home). | When Bluetooth range is a constraint, or for managing nodes not physically nearby. |
Programs Tab
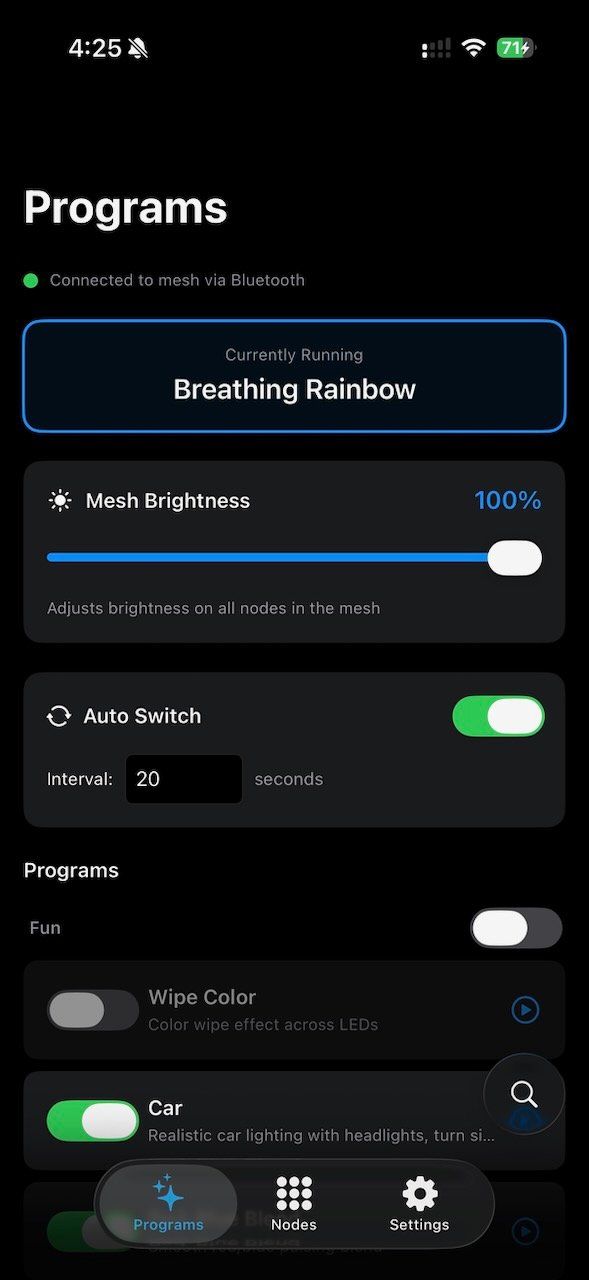
The Programs tab is your main control center for selecting and managing lighting patterns.
Current Program Banner
Shows the currently playing program at the top of the screen. Tap to quickly see what's running.
Mesh Brightness
The brightness slider controls the overall brightness of all nodes in the mesh (0-100%). Changes are applied immediately to all connected nodes.
Auto-Switch
- Enable/Disable: Toggle automatic program switching
- Interval: Set how long each program plays (5-300 seconds)
- Only enabled programs are included in the rotation
Program List
- Programs are organized by category
- Search: Tap the search icon to find programs by name or description
- Enable/Disable: Toggle which programs appear in auto-switch rotation
- Select: Tap a program to play it immediately
Connection Status
The status indicator shows your connection to the mesh:
- Green: Connected and ready
- Orange: Searching for or Connecting to mesh
- Red: Not connected — tap to retry
Nodes Tab
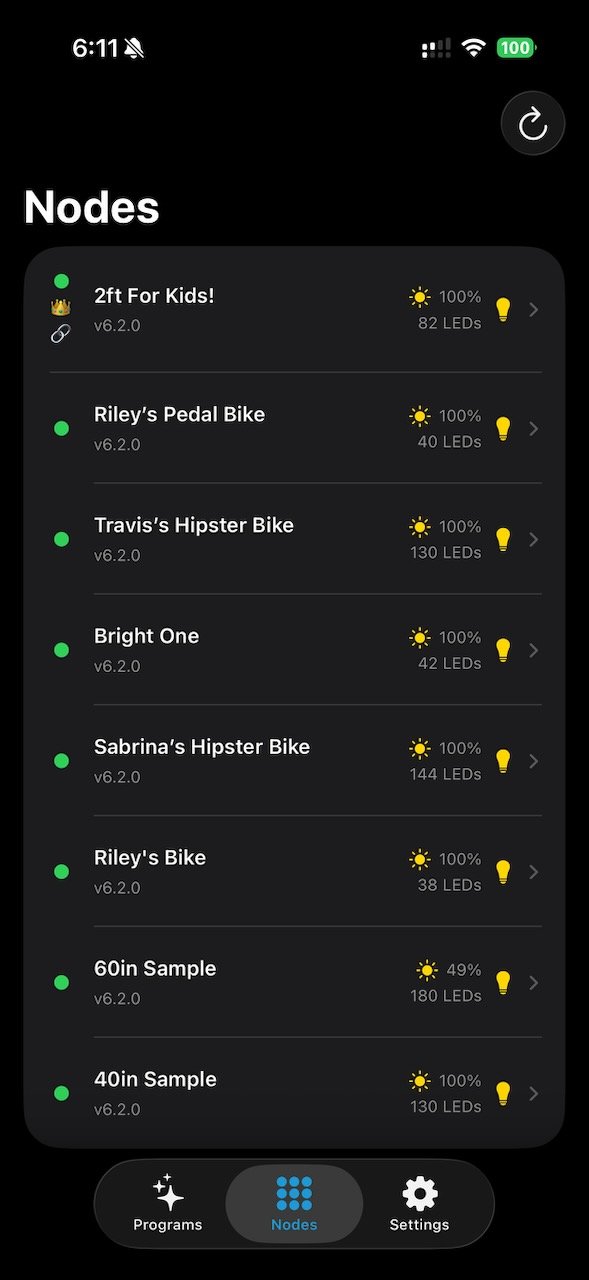
View and manage all nodes in your mesh network.
Node List
- Status Dot: Green = configured, Orange = needs configuration
- Leader Badge: Shows which node is coordinating the mesh
- Flash Button: Tap the lightbulb to flash a node yellow for identification
- Pull to Refresh: Swipe down to refresh node status
Node Information
Each node shows: name, firmware version, LED count, and current brightness level.
Node Detail Settings
Tap any node to access detailed configuration options.
Basic Settings
| Setting | Description |
|---|---|
| Node Name | Give your node a friendly name (e.g., "Front Wheel", "Frame") |
| Brightness | Individual brightness for this node (0-255) |
| LED Count | Number of LEDs connected to this node (1-1200) |
LED Appearance
| Setting | Description |
|---|---|
| Reverse | Reverse the LED strip direction |
| Mirror | Mirror the pattern (useful for symmetrical setups) |
| Rotation | Rotate pattern start point (0°, 90°, 180°, 270°) |
| Color Order | LED chip type (RGB, GRB, etc.) — adjust if colors look wrong |
| Max Current | Power limit in A to prevent overload of your battery (0.5A-10A) |
Motion Detection
If your node has an accelerometer, these settings control power-saving features:
| Setting | Description |
|---|---|
| Dim Timeout | Minutes of stillness before dimming (0 = disabled) |
| Glitter Timeout | Minutes of stillness before glitter-only mode. Set to Dim value to go straight to Glitter. |
| Sleep Timeout | Minutes of stillness before deep sleep. Set to Glitter value to go straight to Sleep. 0 disables Sleep mode. |
| Sensitivity | Motion detection sensitivity. 0=No sensing, 100%=default, 200%=2x sensitive, 400%=super sensitive. |
Smart Brake Light
Ultra Bright models include automatic brake light detection. When the accelerometer senses deceleration, the lights flash red — no button press needed. This feature is always active on supported hardware and requires no app configuration.
Node Actions
- Flash Green: Identify this node
- Flash Red: Alternate identification
- Restart: Reboot the node
Settings Tab

Configure system-wide settings and perform maintenance tasks.
Internet Updates
Connect your nodes to WiFi for automatic firmware updates at boot:
- Primary WiFi: Your main network (SSID and password)
- Backup WiFi: Fallback network (optional)
- Update Channel: Release (stable) or Pre-Release (beta)
- Check for Updates: Manually trigger update check for all nodes in your mesh. Nodes will drop from the mesh, connect to the WiFi network configured on this node, check for updates, then return to the mesh. You will temporarily lose connection to your node(s) while the update check is happening.
Firmware Management
- Download Firmware: Get the latest official firmware
- Cached Firmware: View and manage downloaded firmware files
- Upload Custom: Load your own firmware file
- Distribute: Push firmware to selected nodes
Privacy
Share Usage Data: Optional anonymous telemetry to help improve the project. Shares: Node Name, MAC address, up-time, firmware version, and any other nodes you've connected with.
System Actions
- Reset All Settings: Factory reset (requires confirmation)
- Node Map: Link to the online node map. Note: You will likely need to disconnect from the MissionBikeLights mesh network to access this external webpage.
Watch App Apple Watch Application
The Watch app provides quick controls optimized for glanceable interaction while riding.
Quick Controls
The Watch app has a single screen with all essential controls.
Brightness Control
- Digital Crown: Rotate to adjust mesh brightness (0-100%)
- Visual Indicator: Sun icon and gradient bar show current level
- Changes are sent to all nodes via the iPhone
Program Navigation
| Button | Action |
|---|---|
| ◀ Previous | Switch to the previous program |
| ▶/⏸ Center | Toggle auto-switch mode on/off |
| ▶ Next | Switch to the next program |
Current Program
The current program name is displayed below the control buttons.
Connection Status
The footer shows connection status. Tap to manually refresh:
- Green - "Connected": Full connection to mesh
- Orange - "No Mesh": iPhone connected but mesh unreachable
- Red - "No iPhone": Cannot reach iPhone app
- Yellow - "Connecting": Establishing connection
Web Interface On-Node Web Interface
Each node hosts its own web interface for direct configuration without the app.
Accessing the Web Interface
- Connect to the mesh WiFi network (MissionBikeLights)
- A captive portal should open automatically
- If not, open a browser and go to
http://missionbikelights.local
http://missionbikelights.local doesn't work, try using the "Router" IP address shown in your WiFi settings.
Node Configuration
The web interface allows you to configure:
| Setting | Description |
|---|---|
| Node Name | Friendly name for identification |
| LED Count | Number of LEDs connected |
| Brightness | Default brightness level (0-255) |
| Color Order | RGB, GRB, etc. based on your LED strip |
| Reverse/Mirror | LED direction options |
| Max Current | Power limiting for your setup |
WiFi Settings
Configure internet connectivity for automatic updates:
- Primary Network: Main WiFi SSID and password
- Secondary Network: Backup WiFi (optional)
- Test Connection: Verify WiFi credentials work
- Disable Captive Portal: Stop the automatic popup on connection
Firmware Updates
Update node firmware through the web interface:
Automatic Updates (Recommended)
When connected to WiFi, nodes check for updates automatically at boot. Configure the update channel:
- Release: Stable, tested firmware
- Pre-Release: Beta features, may have bugs
- Custom URL: Your own firmware server
Manual Upload
Upload a firmware file directly through the web interface:
- Download the firmware .bin file
- Go to the node's update page
- Select the file and click Upload
- Wait for the update to complete (node will restart)
Privacy Settings
Anonymous Data Sharing: Opt-in to share anonymous usage data:
- Node name and MAC address
- Uptime statistics
- Firmware version
- Number of nearby mesh nodes
This data helps improve the project and appears on the Node Map.
Troubleshooting
iOS App Won't Connect
Via Bluetooth (recommended):
- Make sure Bluetooth is enabled on your iPhone
- Check that your node is powered on and within range (LEDs should show a pattern)
- Check that the iOS app has Bluetooth permission — go to iPhone Settings → Mission Bike Lights → Bluetooth
- Try closing and reopening the app
- Pull down on the Programs tab to refresh
Via WiFi:
- Make sure your phone is on the same network as the nodes (either the MissionBikeLights hotspot, or your home WiFi if nodes are configured for it)
- Try closing and reopening the app
Watch App Shows "No iPhone"
- Ensure the iPhone app is running (at least in background)
- Check that iPhone and Watch are paired in the Watch app
- Toggle Bluetooth off and on on both devices
- Tap the status indicator on Watch to retry
Colors Look Wrong
- Go to Node Detail Settings
- Change the Color Order setting (try GRB if using RGB)
- Common LED strips use GRB order
Node Not Appearing in List
- Power cycle the node
- Make sure it's within range of other nodes
- Refresh the node list (pull down)
- Check if LED strip is connected (pattern should be visible)
Firmware Update Failed
- Don't disconnect power during updates
- Try the update again after node restarts
- Check WiFi credentials in Settings
- Use the web interface for manual upload if needed
Motion Detection Not Working
- Not all nodes have accelerometers
- Check if motion settings appear in Node Detail
- Adjust sensitivity slider (higher = more sensitive)